Piano Teaching

"Around the World" Piano Theme

"Around the World" Piano Theme

One of my favorite ways to prepare for the new teaching year (or new semester) is choosing a theme and gathering inspiration. Last year, I spent some time planning an "Around the World" theme for my young piano students (inspired by a children's choir curriculum I created a few years ago). So fun! See my inspiration board here.

Pack your bags and join us for an exciting musical journey around the world! This year, students will discover new skills and musical concepts, hear and play new music, and experience the language of music in a rich environment. At the end of the year, children will have suitcases full of new skills and experiences from their musical travels!

Monster Dance

Monster Dance

Last week, I introduced Jennifer Fink's Monster Dance to an 11-year-old student. It was a sight-readable piece for him - something we could put together in one lesson. The piece is written for left hand solo, though it ventures up into the treble clef partway through. Once we had worked through the key patterns, tricky moves, and looked for repeated material, he wanted to play it all the way through from the beginning.

As he played, I thought about the beloved Disney/Pixar film, Monsters, Inc. (one of my personal favorites!).

"Have you seen Monsters, Inc.?" I asked when he finished playing. "Um, yeah, of course!" he said, with a sparkle in his eye. "Have you seen Monsters University?" he asked. "Um, yeah, of course!" I said, imitating his inflection. "I was thinking - which monster is the best match for the music in Monster Dance?" "Definitely Sullivan," he said without pause. "I was thinking Sully, too," I said. "What about Mike Wazowski? What kind of music would fit his character?"

He immediately went to the high side of the piano and started playing something.

The Piano Teacher

Penelope is a bright-eyed, curly-headed girl of almost 8. She often skips into her lesson, singing me the song she composed that week. But one week, in the middle of playing through "Beautiful Dreamer," she fought back tears as she half-whispered, "No one wants to listen to my songs." I put down my notebook and pencil and moved to the bench to sit beside her. "My friends just want to play with me. They don't want to hear me play the piano." We talked about people and how everyone is different. We all like different things and are good at different things. Some people like to be with other people and others would rather be by themselves. "I like to be by myself," she said quietly. "Me, too," I said with a smile. She brushed away a tear from the corner of her eye and we went back to our lesson. Sometimes, it's more important to sit and talk for a minute than hearing every piece on the assignment sheet. Sometimes, lessons are more about building relationships and trust than playing and making music. As musicians, we know how much our emotions impact what we do. Creating music is a vulnerable act, a bearing of our very souls to those listening. Many times I've felt insecure about this and insecure about my abilities when they are not affirmed by others. Maybe you've been there, too. I want to be a teacher that acknowledges these struggles with openness and honesty. Someone who offer that affirmation and encouragement or at least lend a listening ear and say "I understand. I know what you're feeling." I believe this is part of what we are called to do as teachers. We listen when they're going through a hard time, encourage their pursuit of musical excellence, and celebrate their achievements.

We also laugh at their jokes and smile when they're being silly. Like when Graham, a sandy-haired, blue-eyed 1st grader asked to read me a comic he memorized from the New Yorker. At the end of his lesson, he sat on the bench and "performed" the comic for me with a different voice for each character. His mom said the first thing he told her when he got home was that he "made me laugh" with his story.

We are musicians and supporters, encouragers and facilitators, but we're also listeners and mentors, friends and confidants. We are piano teachers.

Piano Olympics Festival

Piano Olympics Festival

Aren’t the Olympics exciting?! 

I love how they bring people together – across nations – to recognize and celebrate hard work, excellence, and achievement

These are things I want to celebrate in my students.

So, inspired by this year’s Winter Olympics and drawing on the five colored rings in the Olympic logo, I created a piano festival based on five key aspects of musicianship:

Blue – Sight-Reading
Gold – Memorization + Performance
Black – Aural Skills (clap-backs, sing-backs, play-backs)
Green – Creativity (improvisation, composition)
Red – Technique

Valentine Composition Project

Valentine Composition Project

As a young piano student, I had a teacher that assigned Valentine composition projects. 

The task was to create a song with words for a friend or family member, notate it in lessons with her guidance, and perform the musical valentine for the person you chose. I remember sitting at the piano in our living room, playing with patterns and ideas until something stuck.

Here is a little sample:

Piano Assignment Sheets

1 / 2 / 3 / 4 / 5 / 6

*Disclosure: I get commissions for purchases made through links in this post.


I started using weekly assignment sheets in my studio last year.

I know from experience that written assignment sheets do not work for every student, but for most of my current students, they make a big difference in organizing home practice and keeping open communication with parents.

Keeping a written record of projects, goals, and repertoire keeps all of us on the same page, even though we're only together for 30 minutes a week.

I thought it might be helpful to those of you considering using assignment sheets in your studio to have a roundup of some of the templates out there. For me, some of the key features of a weekly assignment sheet are:

  • name and date (a way to personalize them for each student)

  • blocks for warm-ups or technic, a few repertoire pieces, and musicianship activities

  • a way to track practice time during the week

PianoPedagogy.org has a great post on using assignment sheets with several templates. In addition, Faber & Faber and Alfred have assignment books (I'm sure others do, as well). Some of these models include staff lines (for composition starters or warm-ups), the circle of fifths, keyboard legends (great for marking hand positions), and space to write messages to parents (and for parents to write messages to you!).

I used many of these models as inspiration for creating my own Studio Assignment Sheet last year. This is what I use with my students on a weekly basis.

Enjoy!


Practice, practice, practice.

Free Resource

A printable assignment sheet for beginning and elementary-age students. Includes: practice log, technic, new and review pieces, musicianship (rhythmic review, aural skills, theory, sight reading, etc.), and creativity (e.g. make a piece that is ___ measures long and uses ___)


NCKP 2013: Part III

A few weeks ago, I had the privilege of attending the National Conference on Keyboard Pedagogy.  In this series, I’ll share my notes and a few favorite quotes from the sessions I attended.  You can read more about NCKP here.

*Disclosure: I get commissions for purchases made through links in this post.


The Art of Group Piano Teaching presented by Christopher Fisher

"Students become responsible for their own and each other's learning."

Positive Benefits

  • limitless performance opportunities build confidence and poise

  • group teaching fosters critical listening and problem-solving skills

  • students can take on specific roles for listening and providing feedback ("players" and "checkers" who check feet, posture, wrist, thumb, knuckles, etc.)

  • discovery-based learning environment with teacher as facilitator

  • ensemble playing develops a strong rhythmic foundation

Suggestions

  • start small; begin with one age group or level of advancement

  • try partner/dyad lessons: 15-minute private lesson + 30-minute overlapped group lesson

  • try summer camps; one idea is to have each student bring in their favorite pop music/lead sheet and have a few other students join them to form a rhythm section

Materials

  • most materials for group teaching can be tailored from any standard method (see Piano Safari)

8 Group Piano Games

1.  "Pass the Rhythm"

  • based on the children's game, "Telephone"

  • students form a line: the person at the back of the line reads or creates a rhythm and taps this pattern on the back of the person standing in front of them

  • once the pattern has made its way all the way down the line, the person at the other end claps and counts the rhythm out loud

  • variation: "Play What I Play"

2.  "Rhythm Bee"

  • based on the spelling bee

  • students form a line: students take turns drawing a rhythm card and clapping and counting the rhythm out loud

  • if the rhythm is incorrect, the student is out

3.  "Musical Chairs"

  • one student improvises, based on a given set of basic parameters; other students walk around a circle or row of chairs until the music stops

  • the person left standing is the next improviser

4.  "Musical Editing"

  • students are given copies of a score

  • the teacher performs from the score, adding expressive markings that are not marked

  • the students "edit" the scores, based on the performance

5.  "Technique Tournament"

  • group students into teams of mixed abilities at the end of the term

  • each player draws a key signature from a cup at the piano and performs the technique exercise for the round

  • example: Round 1: all major scales/arpeggios, Round 2: all harmonic minor scales/arpeggios, Round 3: Hanon Exercises Nos. 1, 2, 5, 6, Round 4: Technical Skills, Book 4 (Magrath)

6.  "Style Improvisations"

  • teacher gives students a basic introduction to two musical styles (i.e. blues and country)

  • students self-form into two groups, research their style, and present an overview lecture

  • the experience culminates in an ensemble performance by each group (ex. one plays the harmonic progression, one improvises a melody, one performs a rhythmic cell; then, students rotate)

  • this prepares students for solo improvisation

7.  "Performance Today"

  • assign students a composer and composition to research (you can even include age-appropriate biographies for them to read)

  • students should do their best to become that composer

  • in the final class, students are interviewed as their composer by other students in the class

  • the class ends with the students performing their assigned compositions

8.  "Sight Reading Composition Exchange"

  • students compose a brief sight-reading example, based on given parameters

  • students exchange their compositions with a friend or draw one from a hat

  • each student previews and prepares their assigned example and gives the world-premiere in class

For more ideas, see Teaching Piano in Groups

Teaching Demonstration by Amy Glennon

Preparatory/reinforcement activities for learning landmarks

  • have students remove non-landmark notes (magnets) from the grand staff

  • sing "this is the sound of Treble G" on Treble G

  • have students move note heads to landmark lines on a whiteboard or smartboard

  • call out landmarks and have students play the notes on the piano

Preparatory activities for spot-placing

  • play the "landmark or not" game with a wooden floor puzzle

  • "Is this a landmark?"

  • ask students to put an x on the closest landmark to the given note (no interval ID or note-naming just yet)

Preparatory activities for eighth notes

  • preparation for reading eighth notes should begin at least 4 weeks before the new piece is introduced

  • speak the words to "Peas Porridge Hot" and put the rhythm in your feet

  • next, clap the rhythm without speaking the words - ask one student to improvise on the rhythm while the rest of the group speaks the words and taps the steady beat

  • speak or sing the words to "Yankee Doodle," marching to the steady beat, then putting the rhythm in your feet

  • ask a small group of students to play the steady beat with rhythm sticks, ask another group to improvise on the rhythm, and ask the others to chant the text

Preparatory activities for dotted quarters

  • have students move with the piano accompaniment: quarter notes + eighth notes

  • have students move with the piano accompaniment: dotted quarters + eighth notes

  • ask students to point and sing, showing the words only (add extra spaces to illustrate the dotted rhythm)

  • have students move + sing with the piano accompaniment

  • introduce the notation (using straight eighths and quarter notes); transform to the dotted rhythm using ties

  • demonstrate how to count the rhythm

  • divide students into two groups and perform both rhythms at the same time (reading) with rhythm sticks

Preparatory activities for crossing 2nd finger over thumb

  • teach this away from the piano (try playing in the air)

  • teach a warm-up pattern (by rote) that concentrates on this, singing the finger numbers

  • introduce a piece like "Joshua Fought the Battle of Jericho"

Preparatory activities for marking the score

  • ask students to point to intervals of a 2nd and "circle the 3rd"

  • ask students to "put a rectangle around the repeated note in the first line"

//

Previously:
NCKP 2013: Part I
NCKP 2013: Part II

NCKP 2013: Part II

5_tips_for_the_transfer_student_interview.jpg

A few weeks ago, I had the privilege of attending the National Conference on Keyboard Pedagogy.  In this series, I'll share my notes and a few favorite quotes from the sessions I attended.  You can read more about NCKP here. This post includes my notes from three NCKP sessions related to intermediate-level students: interviewing transfer students, developing a curriculum, and teaching technique.

SESSION I

Conducting the Transfer Student Interview 
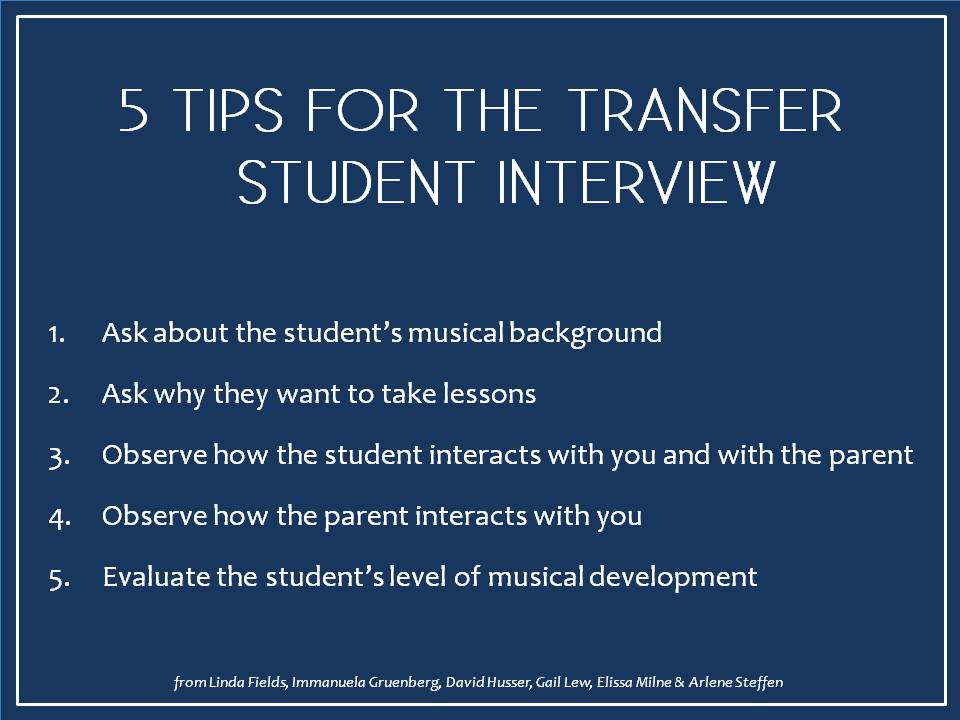
presented by Linda Fields, Immanuela Gruenberg, David Husser, Gail Lew, Elissa Milne & Arlene Steffen

Many of us have had transfer students in our studios at one point or another.  What questions should we ask the family up front to ensure a smooth transition?  How can we quickly assess the student's level of musical development in order to recommend appropriate repertoire moving forward?  The panelists offered a few suggestions:

1. Ask about the student's musical background - Is the child involved in school or community choirs, bands, orchestras, etc.? - What is the parent's background in music?  What are their expectations for their child? - What are the child's practice habits?  Consider recommending an amount of practice time per day that is equal to the student's lesson length. - Ask, "What role does music play in your family?" - Does the child have other interests in sports, dance, theater, etc.?

2. Ask why they want to take lessons - Ask the parent(s), "What are your musical goals for your child?  Consider asking parents to play classical music for their child a little bit every day - in the background, in the car, etc. - Ask the child, "Why do you want to study the piano?" - Ask, "Why do you want to study with me?"

3. Observe how the student interacts with you and with the parent - What do you observe in the child's personality, trust, enthusiasm, and responsiveness to you and to their parent? - How do the parent and child interact?  How does the parent respond to you?  How does the child respond to you? - Does the child have any learning/physical challenges? - How does the child process new information?  Try giving a mini lesson on a simple sightreading piece.  How does the child respond?

4. Evaluate the student's level of musical development - technic - musicality (their connection to instrument) - sight-reading (consider creating reading exams by level) - aural skills (use playbacks: 1-3-5, 1-2-3; singing/matching pitch) - written music theory (consider creating theory exams by level)

5_tips_for_the_transfer_student_interview

Download the handout from this session.

SESSION II

Developing a Curriculum for the Intermediate Transfer Student presented by Jane Magrath

Objectives - "Start with the areas you teach best" - Start where the student is and discover what they respond to

Developing a Curriculum Step 1: Level the student Ask the student to sightread 1-2 lines of three different pieces (classical or romantic) from a leveled series (see Masterwork, Celebration Series, Keith Snell).  Choose three pieces from 3-4 different levels.  Prepare students for success by setting the tempo for them, counting off, and choosing relatively easy-to-read pieces.  Start from the highest level and work your way backwards.

Look for skills in counting, recognizing key signatures, and the ability to read a score.  Keep going until you find the student's reading level.  The student's performance level should be approximately two levels beyond their reading level.

Step 2: Establish a core repertoire plan Plan to use 4-6 books: at minimum, a core repertoire book (well-leveled, generally classical; see Masterwork, Helen Marlais, Celebration Series), a sheet music selection or other repertoire book, and a fun book (hymns, musicals, pop music, jazz; see Gillick: Lyric Preludes; Martha Mier: Jazz, Rags, and Blues; Just for You).

Step 3: Establish a sight-reading plan Find repertoire appropriate for the student's reading level (see Faber & Faber: Sight Reading series, Bastien: A Line a Day, Frederick Harris: Four Star, FJH: Sight Reading & Rhythm Every Day).

Step 4: Assess additional areas - Technique (see MTNA state syllabi leveled technical criteria) - Etudes, exercises (see Czerny, Hanon, Kohler, Concone, RCM Etude books, Clark/Goss/Holland Etude series, Edna Mae Burnam: Dozen a Day, Frances Clark technique books) - Theory, keyboard progressions, jazz, etc. - Composition projects: Give the student a starting place - i.e., "Compose a piece containing sudden changes," or "Create a piece containing sudden dynamic contrast," or "Compose something with contrasting legato and staccato passages" (see Alfred Valerie Cisler composition books).

Determining the difficulty level of pieces 1.  Find similar pieces, one step harder and one step easier.  Note the skills required and notice the number of ideas. 2.  What is the feel on the keyboard? 3.  Consider what the piece requires vs. what the student does well.  Note the presence or absence of patterns. 4.  Does it require double notes (two notes in a hand - around Level 6)?  How thick is the texture? 5.  Notice the number of skips and the distance between them.  How predictable is the melody and phrasing?

Building a Curriculum (ex. 9th or 10th grade student) 1.  Literature collection 2.  Repertoire samples 3.  Quick study pieces: 2-3 weeks, 1-2 pieces at a time (see Classics Alive!, The Hymnal - 1982 or UMH, Melodious Masterpieces) 4.  Special pieces, fun pieces, collaborative/accompanying 5.  Sight-reading: Consider assigning semester-long sight-reading projects for more advanced students (see Clementi sonatinas, Grieg Lyric Pieces, Burgmüller, Op. 100) 6.  Theory (see Keith Snell: Fundamentals of Piano Theory books, Joanne Haroutounian: Explorations in Music, Edith McIntosh: Theory and Musicianship worksheets, Frederick Harris: Sound Advice, MTNA state syllabi) 7.  Keyboard theory: cadences, sequences, chord progressions 8.  Music history/listening: consider assigning a composer biography project - let students create their own presentations once a month 9.  Technique: warm-ups, double thirds, scales, arpeggios, etudes, miscellaneous exercises (stretching/relaxing, Hanon)

Note: Try starting lessons with a little sight-reading.  Consider sight-reading duets together or see Diabelli: 5-finger studies.

Download the handout from this session.

SESSION III

The Technique Behind Intermediate Repertoire presented by Nancy Bachus

Technique "is a complete command of the instrument."  It includes tone production (gravity or weight), keyboard patterns, touches, and physical aspects (gestures and motions).  Did you know that ninety percent of keyboard literature is made up of these six basic patterns: scales, chords, arpeggios, double notes, trills/ornaments and octaves?  This is the foundation for successful playing.

technique_behind_intermediate_repertoire

Technique for Elementary Students - 5-finger patterns in 24 keys: half notes, quarter notes, and eighth notes (with metronome) - Triads in all major/minor keys: solid, broken, and staccato - Arpeggios in all major/minor keys: hand-over-hand - Technic and etudes (see Pischna, Frances Clark technic and etudes)

Technique for Intermediate Students - 3-note chords: solid, broken, and staccato - 4-note chords: solid, broken, and staccato

1.  Clinging legato vs. overlapping legato: for more romantic styles, such as Chopin - mold, create, feel (see Elegie, Op. 126, No. 7  by Chaminade). 2.  Finger staccato vs. wrist staccato: for finger staccato, think of flicking dust off the keyboard.  Try this simple five-finger pattern in triple meter: 5543354432 4432243321.  For wrist staccato, try knocking on keys with your wrists first to get the motion, then try it with your 3rd fingers. 3.  Two-note slur: teach the release first - wrist falls to being level with the keyboard; aim energy to your fingertips.  Think "Fall-feel-pull" or "fall-transfer-pull," where the wrist follows the fingers in the "pull."  Remember, the last note is still melodic. 4.  Larger slur groups: try playing multiple notes within one gesture. 5.  Mix of legato and finger staccato, two-note slur + staccato: practice this with scales - one hand plays eighth notes while the other plays (finger) staccato quarter notes (see Minuet in F Major by Mozart, Imitation by Köhler, Minuet in G Major from Anna Magdalena). 6.  Repeated chords: "throw with an energy."  Your fingers stay on the keys.  Ask, "How much energy do we need?"  Practice this with the Left Hand Study from For Children, Vol. 1  by Bartok (see "Minka" by Beethoven, Tambourin by Gossee). 7.  Repeated notes: remember, it's one motion.  Start from the edge of key; pull fingers back in a reflex motion (see Old Tale by Tcherepnin). 8.  Voicing within one hand: practice balancing on one finger - keep the weight there without shifting (see Stuck on Five and One by Gurlitt, Swineherd's Dance, No. 12 by Bartok). 9.  Divided hand: point your 3rd finger toward your 5th finger to weight that side of the hand, point your 3rd finger toward your thumb to weight that side of the hand.  Practice melody + bass alone, then add the inner line but make it staccato (see Old French Song, Op. 39, No. 16 by Tchaikovsky, Rose Rock by Gurlitt, Three-Quarter Blues [very accessible!] by Gershwin). 10.  Rotation: think of it as turning around a fixed point.  Keep the connection between the fingers.  Think of "turning a doorknob" with your entire forearm.  Remember, you must have a firm arch between your thumb and fifth finger (see Chimes by Tcherepnin).

Warm-up idea: play all 30 Hanon exercises in succession.  This works all five fingers continuously for about 20 minutes.

Teaching the physical aspects (body position, use of hand/fingers, larger gestures/motions)

1.  Shoulder tension: this can even occur between the shoulder and the collarbone. 2.  Natural hand curve: find the student's natural hand curve by having them open their hand on the crown of their head (Nelita True) 3.  Firm nail-joint: "Knock" on the keyboard cover to get heavy nail-joints.  Place a flat hand on the keyboard, pull fingers up, and flatten again.  "Shake" weight into hands (at side).  Hold firm nail-joint (finger by finger) on the edge of the keyboard.  Have someone shake your upper arm and try to hold the nail-joint steady. 4.  Arch: this connects your fingers to your thumb.  Make a fist and walk your thumb and fifth finger on your leg ("bug walk").

"Anything we repeat often enough will become automatic."  Ask students, "What does your brain think is the right way to play this?"

//

Previously: NCKP 2013: Part I Look for more of my notes from NCKP over the next few weeks!

NCKP 2013: Part I

A few weeks ago, I had the privilege of attending the National Conference on Keyboard Pedagogy.  In this series, I'll share my notes and a few favorite quotes from the sessions I attended.  You can read more about NCKP here. Beauty and the Beast in the Piano Studio Marvin Blickenstaff

Beauty

1.  "Beautiful music has the power to change human beings." 2.  "Beautiful music nurtures souls; it enriches lives." 3.  "Momentarily, our lives are changed by beautiful sound." 4.  The human being needs beauty more than bread. 5.  Teaching beauty should be our highest priority.

Here are a few assignments for piano teachers:

Monitor your use of the word "beautiful."  Limit your use to 2-3 times in any given lesson.  Use it with discrimination and discipline; use it sparingly, use it meaningfully.  Students need to hear a beautiful sound and know the standard of what you consider to be beautiful.

Avoid using these words: "Okay" - lacks meaning; be more specific with your responses "Little bit" - you'll get a better response from your students when you exaggerate rather than diminish "Sort of" or "Kind of" - like "little bit" "But" - use "and" as a transition from positive to constructive "Good" - lacks meaning; articulate specifics; document praise with your perspective as a teacher (you only hear the student's performance once a week; students hear their own performance every day of the week)

Improve your teaching vocabulary with adjectives that describe sound.

Start a file of beautiful pieces, things that nurture the "musical soul" of your students.  Here are a couple of examples: "Echoes of November" (Stephen Chapman) "The Lake" (Alec Rowley) "Northern Winter" (Lynn Olson)

Believe in modelingPlay for your students.  Your sound is worth a thousand words.

Play duets with your students"Duets are a pedagogical gold mine;" they teach rhythm, balance, ritards, accelerando, and diminuendo.  The teacher part guides the inflection of the piece and it's a great way to teach beauty.  Beauty, after all, is shaped sound.  "Our emotions are touched first and foremost by dynamic inflection."

When teaching a phrase, give students one thing to listen for, one hint for shaping the phrase.  Say something like, "In between phrases, we take a breath" and experience this in singing.

The Beast: Negative Teaching Attitudes

1.  Repertoire: a teaching year that is focused around only a few pieces

When repertoire is limited to only a few pieces, the student's reading skill is not developed, there is no excitement of new pieces, the narrow focus becomes boring and stagnant, and there is a loss of the student's sense of accomplishment.  Remember, "variety of repertoire is the spice of our musical lives" and "short-term accomplishment is tremendously encouraging to the student."  Instead, focus on building repertoire.  Try beginning one lesson each month with a mini recital of repertoire.

2.  Studio atmosphere that is strict, harsh, critical or unstructured

The "we're just here to have fun" mentality does not work for most students.  Also, type-casting (i.e. boys only like loud and fast pieces and girls only like soft and melodic pieces) does not promote learning or musical development.  "Music is the expression of the entire human condition, through organized sound."  Aim for a wide selection of repertoire for all students

3.  Musicianship skills: getting bogged down in analyzing every note and nit-picking technique

"Keep the magic of the piece alive in our students."

4.  Practice: not teaching the basics of successful practicing

"We don't practice enough with [our students] in the lesson."  Teaching effective practice should be a part of every lesson

5.  How we celebrate success:

Our students are desperate for affirmation; they need to know when they've done a job well.  Communicate this well and often.

//

Look for more of my notes from NCKP over the next few weeks!